Transforming a blank wall into a canvas of cherished memories is a rewarding experience, especially when you can display those moments on a functional piece of art. A DIY photo wall clock offers a unique blend of practicality and profound personal touch, making it an ideal project for anyone looking to infuse their family room with warmth and personality. Imagine a timepiece that not only marks the hours but also celebrates the faces, places, and moments that define your family’s journey. This guide will walk you through creating such a masterpiece, ensuring your family room clock becomes a beloved focal point.
The Enduring Charm of a Personalized Wall Clock
Beyond its primary function of telling time, a personalized wall clock serves as a captivating display of your family’s most treasured moments. It transforms an ordinary household item into a unique storytelling piece, sparking conversations and evoking fond recollections. This bespoke decor adds unparalleled warmth and individuality to any family space, reflecting your shared history and personal style. Unlike mass-produced items, a handmade photo clock is a testament to your creativity and the love embedded in every carefully chosen picture.
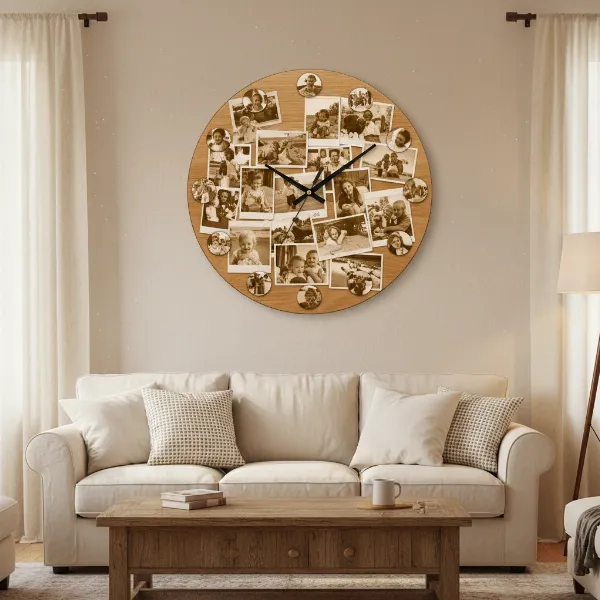 A beautifully crafted DIY photo wall clock displaying cherished family memories in a warm living room.
Gathering Your Essentials: What You’ll Need
Embarking on your DIY photo wall clock project requires a thoughtful collection of materials to ensure both aesthetic appeal and accurate timekeeping.
The Heart of the Clock: Quartz Movement Kit
The clock mechanism is the engine of your project. For DIY clocks, a quartz movement kit is the standard choice due to its accuracy and ease of installation. When selecting a kit, consider:
- Quality: Look for “silent sweep” movements to avoid distracting ticking sounds. High-torque movements are beneficial if you plan on using heavier or longer clock hands.
- Shaft Length: This is crucial. Measure the thickness of your chosen clock base to ensure the mechanism’s shaft is long enough to pass through and allow the hands to be securely attached.
- Components: Most kits include the movement, a hanging hook, washers, a nut, and a set of hour, minute, and second hands. Choose hands that complement your design.
|
Our Picks for the Best Wall clock in 2026
As an Amazon Associate I earn from qualifying purchases.
|
||
| Num | Product | Action |
|---|---|---|
| 1 | AKCISOT Wall Clock, Modern Small Wall Clocks Battery Operated 8 Inch, Silent Non-Ticking Analog Classic for Office, Home, Bathroom, Kitchen, Bedroom, School(Black) |

|
| 2 | AKCISOT Wall Clock 10 Inch Silent Non-Ticking Modern Clocks Battery Operated - Analog Small Classic for Office, Home, Bathroom, Kitchen, Bedroom, School, Living Room(Black) |
|
| 3 | AKCISOT Wall Clock 10 Inch Silent Wall Clocks Battery Operated Non Ticking - Modern Silver Clock Decorative for Kitchen, Bathroom, Bedroom, Living Room, Office, Home(Silver) |
|
| 4 | AKCISOT Wall Clock, Modern Small Wall Clocks Battery Operated 8 Inch, Silent Non-Ticking Analog Classic for Office, Home, Bathroom, Kitchen, Bedroom, School(White) |
|
| 5 | WallarGe 14.5'' Large Digital Wall Clock Battery Operated with Jumbo Numbers, Temperature and Date - Easy to Read and Set, Auto DST |
|
| 6 | HIIXHC Wall Clock, Modern Digital Wall Clocks Battery Operated 10 Inch, Silent Non-Ticking Kitchen Clock, Small Classic Analog Clock Decorative for Living Room Decor, Bedroom,Office, Classroom |
|
| 7 | AKCISOT Atomic 10 Inch Wall Clock Analog Clocks for Indoor Kitchen, Battery Operated Clock for Bedroom Office Classroom Living Room(Black) |
|
| 8 | AKCISOT Wall Clock,Boho Kitchen 10 Inch Wall Clocks Battery Operated Non Ticking,Silent Modern Clock Decorative for Bedroom,Office,Bathroom,Living Room,Home (Wood Grain) |
|
| 9 | AKCISOT Wall Clock, Modern Small Wall Clocks Battery Operated 8 Inch, Silent Non-Ticking Analog Classic for Office, Home, Bathroom, Kitchen, Bedroom, School(Silver) |
|
| 10 | AKCISOT Atomic 10 Inch Wall Clock Analog Clocks for Indoor Kitchen, Battery Operated Clock for Bedroom Office Classroom Living Room(Silver) |
|
Your Canvas: Choosing the Perfect Clock Base
The base forms the foundation of your photo clock, dictating its size, shape, and overall style.
- Repurposed Items: An old wall clock (you’ll remove its original face and mechanism), a sturdy photo frame, or even a vintage vinyl record can make an excellent, eco-friendly base.
- New Materials: Options like MDF (medium-density fiberboard), a smooth wooden circle, thick canvas, or foam board offer versatility for custom sizing and painting.
- Considerations: Think about the desired diameter and the weight capacity for hanging. A larger base allows for more photos or a more prominent display.
Bringing Memories to Life: Your Photos
The photos are, of course, the soul of your project.
- Selection Tips: Choose high-resolution photos that are meaningful to your family. Consider a theme (e.g., vacation photos, milestones, candid moments) or a color palette for a cohesive look.
- Printing Options: You can print photos at home on quality photo paper, use online printing services, or visit a local photo lab. For a seamless application, consider printing on sticker paper, which simplifies adhesion. Matte finishes often reduce glare, while glossy prints offer vibrant colors.
Adhesives & Tools for a Flawless Finish
To bring all these elements together smoothly, you’ll need a few essential tools and adhesives.
- Adhesives: A strong, clear-drying craft glue, spray adhesive, or decoupage medium (like Mod Podge) will secure your photos. If using sticker paper, additional adhesive might not be necessary.
- Precision Tools: An X-Acto knife or craft knife, sharp scissors, a ruler, and a pencil are vital for precise cutting and marking. A drill with an appropriate bit size will be needed if you’re creating a new clock face or repurposing an item without a pre-existing center hole.
- Optional Enhancements: Stencils, paint, or a vinyl cutting machine can add custom numbers, lettering, or decorative elements.
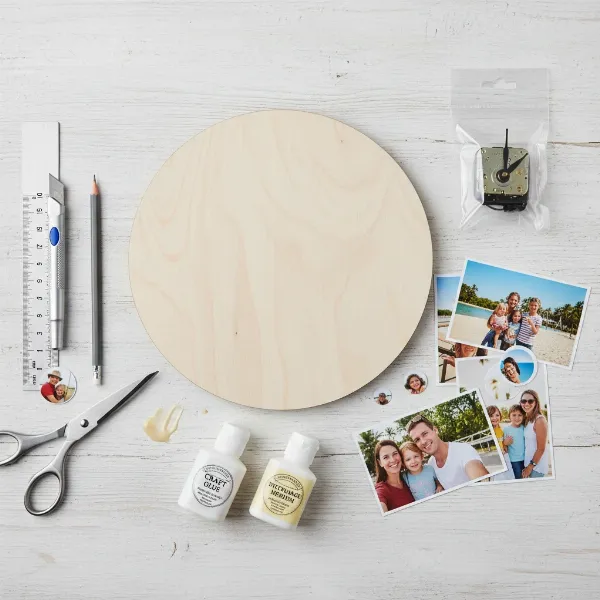 A flat lay of essential materials for crafting a DIY photo wall clock, including a quartz movement, base, photos, and tools.
Step-by-Step: Crafting Your Family Photo Masterpiece
Creating your DIY photo wall clock is a journey of creativity and precision. Follow these steps to assemble a beautiful and functional family heirloom.
Step 1: Design Your Vision
Before applying anything permanently, lay out your chosen photos on your clock base. Experiment with different arrangements: a single large photo, a collage of smaller images, or photos placed at each hour marker. Mark the exact center of your base for the clock mechanism, ensuring it won’t obscure critical parts of your photos. This planning phase allows you to visualize the final look and make adjustments.
Step 2: Prepare Your Clock Base
Once your design is finalized, prepare your base. If it’s an old clock, carefully remove the existing glass, hands, and face. For new wood or MDF bases, you might want to sand it smooth and apply a coat of primer or paint to match your room’s decor. If your base doesn’t have a pre-drilled hole for the clock mechanism, use a drill to create one at your marked center point, ensuring the hole is just wide enough for the mechanism’s shaft.
Step 3: Affix Your Cherished Photos
Carefully attach your photos to the prepared base. If using a single large photo, ensure it’s precisely cut to fit the base’s shape. For collages, apply photos one by one, smoothing out any air bubbles as you go. If using decoupage medium, apply a thin layer to the base, position the photo, then apply another thin layer over the top, working from the center outwards. Allow ample drying time between layers if needed.
Step 4: Install the Clock Mechanism
Once your photos are securely in place and any adhesives are fully dry, it’s time to install the clock mechanism. Insert the mechanism’s shaft through the center hole from the back of the clock base. On the front, secure it with the provided washer and nut, tightening it gently but firmly. Next, carefully attach the clock hands, typically in the order of hour, then minute, then second hand. Ensure they are aligned correctly and move freely without touching each other.
Step 5: Add Numbers or Markers (Optional)
While some minimalist designs forego numbers, adding them can enhance readability and aesthetic appeal. You can use stick-on numbers, stencils with paint, vinyl decals, or even small, distinct photos for each hour. For a simple look, small painted dots or subtle marks at the 12, 3, 6, and 9 o’clock positions suffice. Precision is key here to ensure accurate time display.
Step 6: Final Touches and Hanging
With the mechanism and hands installed, clean the entire surface of your clock to remove any fingerprints or dust. Insert a fresh AA battery into the clock mechanism and set the correct time. Finally, choose a prominent spot in your family room – perhaps above a fireplace, sofa, or dining area – and hang your beautiful new personalized photo wall clock using the hanger provided with the mechanism or a sturdy picture hook.
Making It Last: Care and Maintenance for Your DIY Clock
To ensure your personalized photo wall clock continues to tell time accurately and look its best for years, a little care goes a long way. The primary maintenance task will be battery replacement; typically, quartz movements require a new AA battery every 6-12 months. When changing batteries, always use a fresh, high-quality alkaline battery to prevent leakage. For cleaning, gently wipe the clock face and hands with a soft, dry, lint-free cloth to remove dust. Avoid harsh chemicals or abrasive cleaners, which could damage the photos or the clock face. If the clock hands ever catch or stop moving, gently re-adjust them, ensuring they are not bent or obstructed. Proper placement, away from direct sunlight or extreme humidity, will also help preserve the vibrancy of your photos and the integrity of the clock’s materials.
Integrating Your Photo Clock into Your Family Room Decor
Your DIY photo wall clock is more than just a time-telling device; it’s a statement piece designed to celebrate your family. Integrating it seamlessly into your family room decor can elevate the entire space. Consider making it a focal point by hanging it on a prominent wall where it draws attention and sparks conversation. If your family room has a rustic charm, a wooden base with sepia-toned photos would complement it beautifully. For modern interiors, a sleek acrylic base with vibrant, contemporary photos could be stunning. Your photo clock can also be part of a larger gallery wall, surrounded by other framed memories or decorative art, creating a rich visual tapestry that tells your family’s story.
Smart Shopping: Your DIY Clock Kit and Supply Guide
Finding the right supplies is key to a successful and long-lasting DIY photo wall clock. For quality clock movements, specialty online stores such as Timesavers.com or Klockit.com are highly recommended, often offering a wider selection of sizes and features like silent sweep or high torque movements. While Amazon also carries clock kits, checking reviews for durability and accuracy is essential to avoid cheaper options that may not keep time reliably. When it comes to photo printing, opt for reputable services or use a high-quality home printer with archival-grade photo paper for vibrant, fade-resistant images. Don’t forget durable adhesives like Mod Podge or a strong spray adhesive. Budgeting for these quality components ensures your handmade clock will be a cherished keepsake for years to come.
Conclusion
Crafting a DIY photo wall clock for your family room is a deeply rewarding project that marries functionality with heartfelt sentiment. It’s an opportunity to create a unique piece of home decor that truly reflects your family’s personality and history. More than just telling time, this personalized clock tells your story, transforming everyday moments into a timeless display. So, gather your favorite photos, choose your materials, and embark on this creative journey. You’ll not only enjoy the process but also cherish the lasting beauty and warmth it brings to your home.
What memories will you choose to put on display?
Frequently Asked Questions
How long does it take to make a DIY photo clock?
The time required can vary based on the complexity of your design and your crafting experience. A simple photo overlay on an existing clock might take an hour or two, while a detailed collage on a new base, including drying times for paint or adhesive, could span a few hours over a day.
What type of glue is best for attaching photos to a clock face?
For most applications, a strong, clear-drying craft glue or spray adhesive works well. For a seamless finish, especially with collages, decoupage medium (like Mod Podge) is an excellent choice as it seals and protects the photos while adhering them to the surface.
Can I use an old clock for this project?
Absolutely! Repurposing an old clock is a fantastic way to give it new life. You’ll typically remove the original face and hands, then use the existing clock frame and mechanism (or replace the mechanism if it’s not working) as your base for customization.
How do I ensure the clock hands are properly spaced and don’t get stuck?
When attaching the clock hands, ensure they are placed in the correct order (hour, minute, then second) and are gently but firmly pushed onto the mechanism shaft. Visually check that each hand is straight and there’s enough clearance between them so they don’t touch or rub against each other as they move.
What if I don’t want numbers on my clock?
Many modern and minimalist DIY photo clocks omit traditional numbers. You can use the photos themselves as hour markers, place small decorative embellishments, or simply leave the spaces blank. The clock’s design is entirely up to your personal aesthetic.