Has a cherished wall clock in your home stopped ticking, turning a beautiful timepiece into a silent sentinel of a bygone era? As someone with over a decade of experience delving into every facet of wall clocks, from their intricate history to their technological advancements, I understand the sentimental value these pieces hold. Often, the solution is simpler than you might imagine: a broken clock movement can be easily replaced, breathing new life into your beloved clock. This comprehensive guide will walk you through the process, equipping you with the knowledge to select the right parts, the tools you’ll need, and a clear, step-by-step approach to get your wall clock keeping time accurately once more. You’ll discover that restoring your clock yourself is not only satisfying but also ensures its continued presence in your space.
The Heart of Time: Understanding Your Wall Clock’s Movement
At the core of every wall clock, hidden from plain sight, lies its “movement” – the intricate mechanism responsible for turning the hands and keeping accurate time. Often referred to as the clock’s motor or mechanism, this small black box is the engine that drives your clock.
The most prevalent type you’ll encounter in modern wall clocks is the quartz movement. These movements utilize a small quartz crystal that, when electrified, vibrates at a precise, stable frequency, ensuring consistent timekeeping. Compared to traditional wind-up mechanical clocks, quartz movements are remarkably simpler in design and maintenance, making them ideal for DIY repairs.
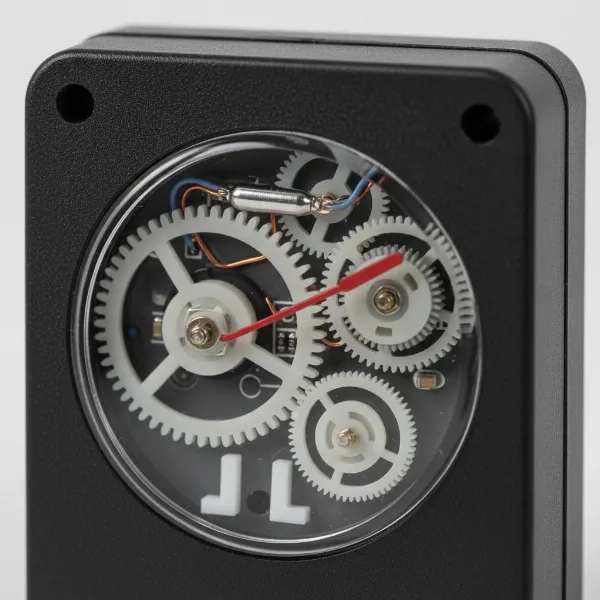 Internal view of a modern quartz clock movement, showing the crystal and gears for accurate timekeeping.
Recognizing a failing movement is usually straightforward. If your clock has stopped completely, even with a fresh battery, or if it’s consistently losing or gaining time despite adjustments, it’s a strong indicator that the movement has reached the end of its lifespan or is damaged. Corrosion from old batteries can also render a movement inoperable.
Gearing Up for Repair: Tools and Finding the Right Replacement
Before you embark on the rewarding journey of clock repair, gathering the necessary tools and selecting the correct replacement movement kit are crucial steps. A little preparation ensures a smooth and successful operation.
Essential Tools for the Job:
You won’t need a vast array of specialized equipment. Most of what you require can likely be found in a standard household toolbox:
- Small Pliers: Indispensable for loosening hex nuts or securing components.
- Small Flathead Screwdriver: Useful for prying, especially if your movement is secured by a brass collar nut.
- Small Pry Bar or Two Forks: These can be gently used to lift off stubborn clock hands without bending them.
- Soft Cloth or Gloves: To protect the clock face and hands from fingerprints or scratches.
- Rubbing Alcohol and Cotton Swabs (Optional): For cleaning any dust or corrosion.
|
Our Picks for the Best Wall clock in 2026
As an Amazon Associate I earn from qualifying purchases.
|
||
| Num | Product | Action |
|---|---|---|
| 1 | AKCISOT Wall Clock 10 Inch Silent Wall Clocks Battery Operated Non Ticking - Modern Silver Clock Decorative for Kitchen, Bathroom, Bedroom, Living Room, Office, Home(Silver) |

|
| 2 | AKCISOT Atomic 10 Inch Wall Clock Analog Clocks for Indoor Kitchen, Battery Operated Clock for Bedroom Office Classroom Living Room(Silver) |
|
| 3 | AKCISOT Wall Clock,Boho Kitchen 10 Inch Wall Clocks Battery Operated Non Ticking,Silent Modern Clock Decorative for Bedroom,Office,Bathroom,Living Room,Home (Wood Grain) |
|
| 4 | AKCISOT Atomic 10 Inch Wall Clock Analog Clocks for Indoor Kitchen, Battery Operated Clock for Bedroom Office Classroom Living Room(Black) |
|
| 5 | HIIXHC Wall Clock, Modern Digital Wall Clocks Battery Operated 10 Inch, Silent Non-Ticking Kitchen Clock, Small Classic Analog Clock Decorative for Living Room Decor, Bedroom,Office, Classroom |
|
| 6 | WallarGe 14.5'' Large Digital Wall Clock Battery Operated with Jumbo Numbers, Temperature and Date - Easy to Read and Set, Auto DST |
|
| 7 | AKCISOT Wall Clock, Modern Small Wall Clocks Battery Operated 8 Inch, Silent Non-Ticking Analog Classic for Office, Home, Bathroom, Kitchen, Bedroom, School(Black) |
|
| 8 | AKCISOT Wall Clock, Modern Small Wall Clocks Battery Operated 8 Inch, Silent Non-Ticking Analog Classic for Office, Home, Bathroom, Kitchen, Bedroom, School(Silver) |
|
| 9 | AKCISOT Wall Clock 10 Inch Silent Non-Ticking Modern Clocks Battery Operated - Analog Small Classic for Office, Home, Bathroom, Kitchen, Bedroom, School, Living Room(Black) |
|
| 10 | AKCISOT Wall Clock, Modern Small Wall Clocks Battery Operated 8 Inch, Silent Non-Ticking Analog Classic for Office, Home, Bathroom, Kitchen, Bedroom, School(White) |
|
Selecting Your New Clock Movement Kit:
Choosing the correct replacement movement is the most critical decision. The wrong size or type will prevent your clock from functioning properly.
Shaft Length: The Critical Measurement
The most important dimension to match is the shaft length of the new movement. This is the threaded part that protrudes through the clock face, onto which the hands are mounted. It must be long enough to pass through your clock’s dial thickness and any front glass, while still providing enough thread for the securing nut and the hands. Measure the shaft length of your old movement from the base of the movement to the tip of the threaded shaft.
Hand Fit and Style
Most new movement kits come with a selection of clock hands, but you might want to reuse your original hands for aesthetic reasons. Ensure that the new movement’s hand arbors (the tiny posts onto which the hands attach) are compatible with your existing hands. Alternatively, choose a kit where the included hands complement your clock’s style and are the appropriate length for its dial.
Considering Movement Type (Quartz vs. Others)
This guide focuses on replacing standard quartz movements, which are battery-operated and by far the most common in wall clocks. If your clock is a mechanical, chiming, or pendulum clock (and you want to retain these features), note that these often require specialized movements and replacement procedures that go beyond a basic quartz swap. Confirm your old movement is a simple quartz mechanism before proceeding.
Step-by-Step: Your DIY Guide to Replacing a Clock Movement
With your tools ready and the perfect replacement movement in hand, you’re prepared to restore your clock. Follow these steps carefully for a seamless repair.
Step 1: Preparation and Disassembly
First, remove the battery from your clock. If your clock has a glass or plastic lens protecting the face, carefully remove it. The method varies by clock, often involving clips, screws, or simply lifting a hinged front. Set it aside safely.
Step 2: Removing the Old Movement
This is where you’ll gently remove the old, broken components.
- Remove Clock Hands: Start with the second hand (if present). It usually pulls straight off. Next, carefully lift the minute hand, then the hour hand. Gently pry them off near their bases to avoid bending them. Sometimes a small pair of pliers or two forks can help leverage them off without damage.
- Detach the Movement: Turn the clock over. The movement is typically held in place by a hex nut or a brass collar nut on the threaded shaft. Use your pliers or flathead screwdriver to unscrew this nut. Remove any washers that secure the movement.
- Extract the Movement: Once the nut and washers are off, the old movement should slide out from the back of the clock. Examine it for any signs of corrosion or dust, which can inform your maintenance in the future.
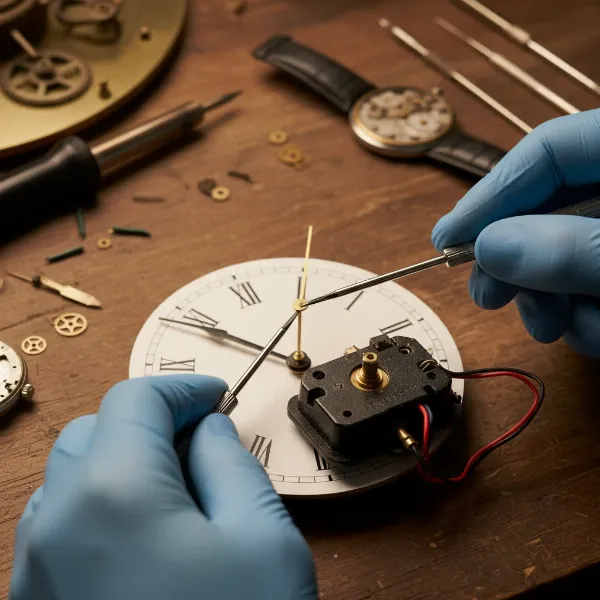 Hands carefully removing the minute and hour hands from a wall clock dial before detaching the old movement.
Step 3: Installing Your New Movement
Now, it’s time to fit the new heart of your clock.
- Prepare the Movement: Your new movement kit should include a rubber washer. Slide this washer onto the threaded shaft of your new movement. This helps create a snug fit and protects the dial.
- Insert Through Dial: From the back of the clock, carefully insert the threaded shaft of the new movement through the center hole of your clock face. Ensure the hanging hook (if your movement has one) is oriented correctly for hanging.
- Secure the Movement: On the front side of the clock, slide the brass washer over the threaded shaft, followed by the hex nut or brass collar nut. Hand-tighten the nut first, then gently snug it down with your pliers or screwdriver. Do not over-tighten, as this could damage the movement or the clock face.
Step 4: Reattaching the Clock Hands
This step requires precision to ensure proper timekeeping.
- Set Time to 12 O’Clock: Rotate the movement’s adjustment knob (usually on the back) until the small pins for the hour and minute hands are aligned at the 12 o’clock position.
- Attach Hour Hand: Gently press the hour hand onto its post, ensuring it’s aligned exactly at 12.
- Attach Minute Hand: Next, press the minute hand onto its post, also aligning it precisely at 12.
- Attach Second Hand (Optional): If you have a second hand, carefully press it onto the thinnest central pin, ensuring it too is at the 12 o’clock mark.
- Check Alignment: Ensure all hands are parallel to the clock face and to each other, with about 1mm of space between them so they don’t touch as they rotate. This is crucial to prevent them from getting stuck.
Step 5: Testing and Setting the Time
Almost done! It’s time to see your handiwork in action.
- Insert Battery: Insert a fresh, good-quality battery into the new movement.
- Set Time: Use the adjustment knob on the back of the movement to set the correct time.
- Observe: Watch your clock for a few minutes to ensure the hands are moving smoothly and not catching on each other. Listen for a consistent tick (or enjoy the silence of a silent sweep movement).
Comparison Table: Popular Clock Movement Kit Features
When choosing a replacement or for a new clock project, understanding the nuances between different quartz movement kits can help you select the ideal option for your needs.
| Feature/Type | Standard Quartz | High Torque Quartz | Silent Sweep Quartz | Pendulum Quartz |
|---|---|---|---|---|
| Best For | Everyday wall clocks, average-sized hands | Large clocks, heavy or long hands (over 7 inches) | Bedrooms, offices, or quiet living spaces | Clocks designed with a decorative pendulum feature |
| Ticking Sound | Distinct, audible “tick” each second | Often an audible “tick” | Virtually silent, continuous sweeping motion | Audible “tick,” often with a separate mechanism for pendulum swing |
| Shaft Lengths | Wide range of lengths available | Tend to offer longer shaft options for thicker dials | Various lengths to accommodate different clock faces | Requires specific shaft lengths to accommodate the pendulum arm |
| Hand Compatibility | Standard light to medium-weight clock hands | Designed for heavier, longer hands | Standard light to medium-weight clock hands | Standard light to medium-weight clock hands, often sold with compatible pendulum rods |
Troubleshooting and Maintenance: Keeping Your Wall Clock Ticking
Even with a perfectly executed replacement, minor issues can sometimes arise. Knowing how to troubleshoot and maintain your wall clock’s new movement will ensure it provides years of accurate timekeeping.
Common Post-Replacement Issues:
- Hands are stuck or catching: This is typically due to improper alignment during installation. The hands might be pressing against each other or scraping the clock face or lens. Carefully remove the hands and reattach them, ensuring enough clearance (about 1mm) between each hand and the clock face/lens. Make sure they are perfectly parallel.
- Clock is not keeping accurate time: First, double-check that you’ve inserted a fresh, high-quality battery. If the issue persists, the movement might not be fully secured, or the hands could be too tight on their arbors, creating resistance. Re-tighten the securing nut (without over-tightening) and gently adjust the hands to ensure they move freely.
- Loud ticking: While most standard quartz movements have an audible tick, if it seems excessively loud, ensure the movement is firmly seated and not vibrating against the clock case. Consider a silent sweep movement for future replacements if quietness is a priority.
Long-Term Care for Your Wall Clock’s New Movement:
To maximize the lifespan of your newly installed movement:
- Regular Battery Checks: Replace batteries promptly when they run low, and avoid leaving dead batteries in the movement, as they can leak and cause corrosion.
- Keep Free from Dust: Periodically wipe down the back of your clock, particularly around the movement, to prevent dust buildup from interfering with its operation.
- Gentle Handling: Always handle your wall clock with care. Sudden jolts or drops can damage the delicate internal gears of the movement.
- Stable Environment: Avoid hanging your clock in areas with extreme temperature fluctuations or high humidity, which can affect the movement’s performance and battery life.
Buying Guide: What to Look for in a Clock Movement Kit
Purchasing the right clock movement kit is paramount for a successful repair or new project. Consider these factors to ensure you make the best choice.
Matching Dimensions: Shaft Length and Hand Arbors
As highlighted, the shaft length is critical. Measure accurately from the front of the clock case (or the surface the movement mounts to) to the very end of the threaded shaft. Also, note the shape and dimensions of the hand arbors (the center pins) to ensure compatibility with your existing hands or to choose a kit with suitable new hands. There are different styles (e.g., I-shaft, Euroshaft), so matching this is important.
Movement Features: Sound, Pendulum Drive, and More
- Sound: Do you prefer a distinct “tick” or the quiet, continuous motion of a silent sweep movement? This is a personal preference that significantly impacts the clock’s presence in a room.
- Pendulum Drive: If your clock has a decorative pendulum, ensure the replacement kit includes a separate pendulum driver or is designed to accommodate one. These movements will have an extra shaft or hook for the pendulum.
- High Torque: For larger clocks with hands over 7 inches long or heavier hands, a high torque movement provides the extra power needed to move them consistently.
- Additional Features: Some movements offer chimes, alarms, or even remote-controlled time setting. Consider if these advanced features are necessary for your clock.
Reputable Brands and Where to Buy
Look for movements from established brands known for their reliability and accuracy. Brands like Takane (as mentioned by some experts) have a good reputation in the clock-making community.
You can typically purchase clock movement kits from:
- Online Retailers: Websites specializing in clock parts offer the widest selection of sizes, styles, and features.
- Craft Stores: Many large craft or hobby stores carry basic quartz movement kits, especially suitable for new clock-making projects.
- Specialty Clock Shops: These stores often have knowledgeable staff who can help you measure and select the precise movement you need, sometimes even offering unique or harder-to-find options.
Always read product descriptions carefully, paying close attention to dimensions and included accessories, to avoid purchasing an incompatible kit.
Conclusion
Restoring a broken wall clock by replacing its movement is a truly rewarding DIY project that brings both functionality and beauty back to your home. By understanding the basics of clock movements, carefully selecting the right replacement kit, and following a clear, step-by-step process, you can transform a silent relic into a cherished timepiece once more. The satisfaction of seeing your once-still clock tick to life, accurately keeping time, is immense. So, what wall clock will you bring back to life first?
Frequently Asked Questions
How do I know what size clock movement shaft to buy?
Measure the threaded portion of your old movement’s shaft from the base where it meets the movement body to its tip. This measurement, along with your clock dial’s thickness, will help you select a new movement with the appropriate shaft length to pass through the dial and allow for the securing nut and hands.
Can I replace a mechanical clock movement with a quartz one?
While technically possible, this guide focuses on replacing existing quartz movements. Swapping a mechanical movement for a quartz one usually requires significant modifications to the clock case, hands, and dial, and may detract from the clock’s original value and character.
Why are my clock hands getting stuck after replacement?
Hands typically get stuck if they are not perfectly parallel to the clock face or to each other, causing friction as they rotate. Ensure there is about 1mm of clearance between each hand and the dial/lens, and that they are pressed on gently but firmly enough to move freely without wobbling.
What tools do I absolutely need for this DIY project?
For a basic quartz movement replacement, you’ll need small pliers (or an adjustable wrench for hex nuts), a small flathead screwdriver (for brass collar nuts), and possibly a small pry bar or two forks to carefully remove the clock hands without bending them.
How often should I replace the battery in my quartz clock?
The lifespan of a battery in a quartz clock can vary significantly depending on the battery quality, movement type (e.g., high torque movements consume more power), and hand length/weight. Generally, expect to replace a standard AA battery every 9-12 months for optimal performance.